Arduino is an open-source electronics platform combining programmable boards, software tools and libraries. It makes it easier to connect a program to the physical world: reading a temperature sensor, lighting an LED, moving a motor or sending a measurement to a dashboard. It is an accessible and enjoyable starting point for hobbyists, students and makers, while still giving you plenty to learn about code and circuits.
The familiar UNO R3 is a microcontroller board. You write a program, called a sketch, compile it and upload it to the board. The program stays in flash memory when power is removed, then starts again when the board is powered. You do not need to leave your computer connected for a correctly powered standalone project to continue running.
Arduino and Raspberry Pi: choose the right kind of board
A classic Arduino microcontroller board is well suited to a focused task such as reading sensors and controlling outputs. A Raspberry Pi single-board computer is useful when the project needs Linux applications, a graphical interface, a database or more extensive processing. They can also work together: the microcontroller handles inputs and outputs while a computer stores data or provides the user interface.
These are product families, not absolute rules. Raspberry Pi also makes Pico microcontroller boards, and Arduino's newer UNO Q combines a Linux application processor with a separate microcontroller running sketches over Zephyr OS. Some Arduino cores use an operating-system layer, such as the GIGA R1 WiFi's Mbed-based core. Check the exact model instead of assuming every Arduino runs bare-metal code or every Raspberry Pi is a Linux computer.
A microcontroller can provide useful timing control, but arbitrary sketch code does not guarantee microsecond precision or a fixed reboot time. Sensor reads, communication, interrupts and blocking delays affect responsiveness. Match the program and hardware to the timing you need; a faster clock alone does not fix a poorly structured control loop.
Examples of Arduino boards
The UNO remains a good beginner choice because many introductory projects use it. A Starter Kit can be useful when you want the board, compatible components and guided projects together. For other jobs, choose by pin count, memory, connectivity and voltage, rather than by the family name alone.
| Exact board | Main microcontroller and clock | Logic level | Useful distinction |
|---|---|---|---|
| UNO R3 | ATmega328P, 16 MHz | 5 V | 14 digital I/O pins and six analog inputs; 32 KB flash and 2 KB SRAM |
| Classic Nano | ATmega328, 16 MHz | 5 V | Compact breadboard format; no built-in Wi-Fi |
| Nano 33 IoT | SAMD21, 48 MHz | 3.3 V | NINA-W102 Wi-Fi/Bluetooth module; the Nano pictured below |
| Mega 2560 Rev3 | ATmega2560, 16 MHz | 5 V | 54 digital pins, 16 analog inputs and four hardware serial ports |
| MKR WiFi 1010 | SAMD21, 48 MHz | 3.3 V | NINA-W102 connectivity and a battery-charging circuit |
| UNO R4 WiFi | Renesas RA4M1, 48 MHz | 5 V main GPIO | 32 KB SRAM and 256 KB flash; ESP32-S3 handles wireless connectivity |
| GIGA R1 WiFi | STM32H747, Cortex-M7/M4 at 480/240 MHz | 3.3 V | More extensive I/O, camera/display connectors and audio features |
The MKR WiFi 1010 and Nano 33 IoT use a SAMD21 as the main sketch processor; the ESP32-based NINA module provides connectivity. They are not interchangeable with a generic ESP32 development board. Likewise, an R3 sketch or shield may need changes for an R4 because the underlying processor and libraries differ.
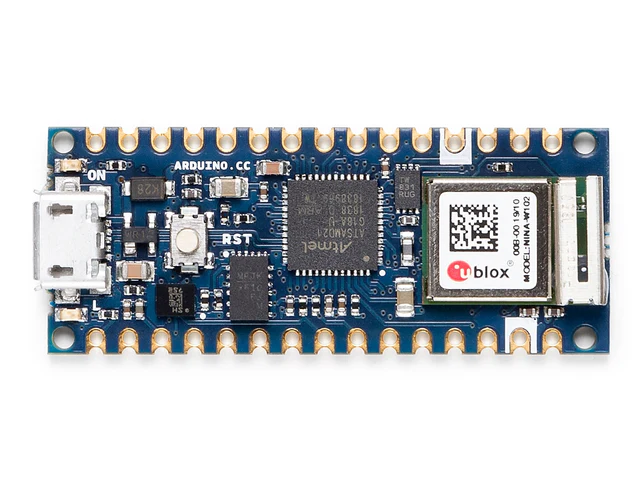
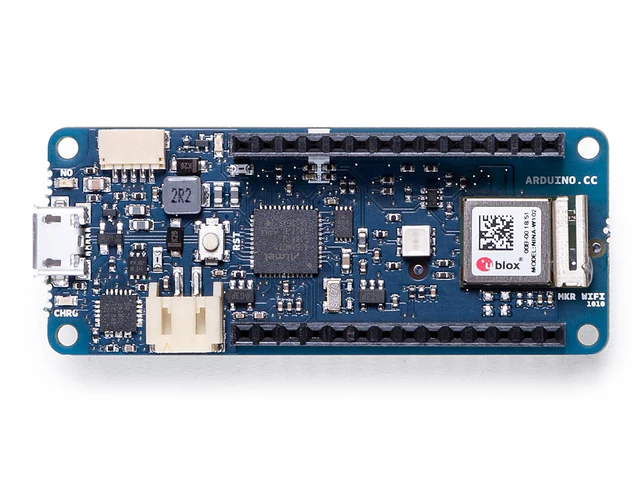
The Nano 33 IoT and MKR WiFi 1010 pins are not 5 V tolerant. A 5 V supply input or USB connector does not make every signal pin safe for 5 V. Read the board's pinout and the sensor's electrical specifications before wiring them together; use an appropriate level translator where required.
How to start with a first sketch
You need a board, a suitable data-capable USB cable, a computer with the Arduino IDE and any components required by the project. A charging-only cable can power a board without allowing programming, so it is a useful first check when the computer cannot see it.
- Install the correct board package. Use the IDE's board management tools and select the exact board. Different processor families require different cores.
- Connect and select the port. Confirm that the detected serial device corresponds to the board, rather than another connected USB device.
- Open a simple example. The built-in Blink example is a good first exercise on a board with the appropriate onboard LED. It uses
LED_BUILTINinstead of assuming every board's LED is connected to the same pin. - Compile, then upload. Compilation checks whether the code can be built; uploading transfers the resulting program. A successful compile does not prove that your circuit is wired correctly.
- Change one thing. Adjust the blink interval, observe the result and save your working sketch before adding a sensor.
Arduino sketches use C++ with the Arduino API and board libraries; you are not learning an unrelated programming language. In a conventional sketch, setup() runs once after startup or reset to initialise pins, libraries or serial communication. loop() then repeats the main work. Long delay() calls hold up subsequent loop code, so learn the BlinkWithoutDelay approach when several tasks need to stay responsive.
Pins, sensors and outputs
Digital inputs read states such as a button being pressed; digital outputs set a high or low signal. Analog inputs measure a voltage through an analog-to-digital converter. The allowed voltage, resolution and reference vary by board. A raw sensor number needs conversion or calibration before it becomes a trustworthy temperature or moisture reading.
PWM repeatedly switches an output, allowing you to change its duty cycle for jobs such as LED brightness. It is not automatically a smooth analog voltage, and it is available only on suitable pins. A board with a DAC can provide a different kind of analog output. Use the exact pinout and library instructions rather than treating all output pins alike.
I²C connects addressed devices through SDA and SCL; check addresses, pull-up voltages and wiring. SPI uses clock and data signals plus device selection. UART provides serial communication. These interfaces reduce wiring for compatible sensors and displays, but a matching connector or library name does not establish electrical compatibility.
GPIO pins are control signals with current limits. Use a suitable driver circuit or motor shield for motors and pumps, and a current-limiting resistor for an external LED. Keep beginner experiments to appropriately powered low-voltage circuits. Start with the manufacturer's example before adapting the wiring or connecting a larger load.
Projects worth trying
- Blinking LED and buttons: Learn outputs, inputs and simple conditions. Add a button after Blink works so each new component has a clear purpose.
- Temperature display: Read a compatible sensor, print the readings to the Serial Monitor and then add an LCD or OLED. Compare plausible readings and units before displaying them as precise measurements.
- Plant watering: Begin by recording moisture readings. Once calibrated for the actual pot and soil, add a pump driver, a maximum run time and a response to missing or implausible readings. Test with a small controlled setup before leaving it unattended.
- Obstacle-avoiding robot: Combine distance sensing with motor control, but verify each subsystem separately. Motor power demand and noise can cause resets even when the software compiles.
- Wearable or interactive art: Buttons, motion sensors, lights and sound offer creative projects. Consider enclosure, wiring strain, battery choice and how the user interacts with the finished object.
These are project ideas rather than complete circuit designs. Identify the board, sensor, power supply and libraries needed before buying parts. A working tutorial for one voltage or processor family may need adaptation for another.
Arduino Cloud and local automation
Arduino Cloud provides an online editor, device dashboards, data history and integrations such as Alexa. Compatible IoT boards include the MKR WiFi 1010, Nano 33 IoT, UNO R4 WiFi and GIGA R1 WiFi. Using a board in the browser editor is different from that board having an automatically configured network connection to the IoT service.
Over-the-air updates are available for supported hardware and plans, but not every board or configuration gains them simply by being Arduino-compatible. Check the current hardware requirements, initial setup and Cloud plan limits. Compare device/Thing limits, variables, retained data and recurring costs against the dashboard you need; current business and enterprise options also exist.
The convenience is appealing for small projects: you can view measurements remotely without building every dashboard component yourself. The tradeoff is dependence on connectivity and a hosted service for remote features. Your local sketch can continue its own programmed behaviour, but you must decide what it does if network access fails. Do not make a pump's basic shutoff depend solely on a remote dashboard command.
A local MQTT design is another option for network-capable boards. The sketch publishes measurements to a broker, and Home Assistant's MQTT integration uses configured topics or discovery messages to create entities. Sending arbitrary JSON alone does not automatically register a Home Assistant sensor. Check broker/client compatibility and use suitable credentials.
ESPHome offers a different route on its supported platforms, including suitable ESP32 boards. It is not a universal firmware option for every Arduino model. An ESP32 used with Arduino libraries and that same device running ESPHome are different software choices. Choose the supported board and integration path first rather than assuming the UNO R3 or a SAMD21 board will accept the same firmware.
Power and troubleshooting
Microcontrollers can suit battery-powered projects, but measure the complete board and peripherals. Voltage regulators, indicator LEDs, sensors and radios can consume power even when the main processor sleeps. Battery life depends on the average load, wake interval, transmission time, battery capacity and losses. A chip's low-power figure does not promise a complete development board will run for years on AA cells.
Use the supported supply input and battery arrangement for your exact board. For example, the MKR WiFi 1010 has charging requirements that must match the attached battery; a Nano 33 IoT does not include that charging circuit. Allow for motors or transmitters drawing more current than an idle sensor reading requires.
For debugging, separate compilation, upload and runtime problems. Check the selected board/core and required libraries for compilation errors; check the cable, port and board-specific recovery instructions for upload failures. At runtime, use Serial.println() to observe sensor values and program states, with the Serial Monitor set appropriately for your sketch. Repeated resets suggest checking power and wiring as well as code.
Advantages, limits and alternatives
Arduino's strengths are its approachable tools, documented examples and large community. Basic boards can be an affordable way into electronics, although the full project cost includes sensors, cables, drivers and power. You still need to learn coding and circuit building; small-memory boards have limits for demanding applications. Arduino remains a fantastic starting point when the project fits the chosen hardware.
For a Linux application or media project, compare a Raspberry Pi computer; we have an extensive Raspberry Pi section. For a connected microcontroller, consider a suitable ESP32 board. A micro:bit is another educational option with built-in buttons, LEDs and sensors. Teensy offers compact microcontroller boards, including faster models for more demanding processing. BeagleBone Black combines Linux with extensive expansion interfaces and programmable real-time units. Compare the exact models, development tools and pin requirements rather than choosing solely by brand.
Start small, experiment and let your creativity guide the next project. A reliable LED, sensor or display teaches you more than adding every feature at once. Visit the official Arduino Website and use its documentation for the particular board on your desk.