Home Assistant is an open-source home automation platform that allows you to control and automate devices in your smart home. Running Home Assistant on a Raspberry Pi is an affordable and flexible way to set up a smart home hub. Whether you're a tech enthusiast or a beginner, this guide will walk you through the process. For more information on Home Assistant, visit the first instalment in this series: Understanding Home Assistant: Your Gateway to a Smarter Home. In this installment, we are going to install and run Home Assistant OS on a Raspberry Pi.
A quick sidenote on the Raspberry Pi you will be using: We tried running Home Assistant on a Raspberry Pi Zero W for some time, and although it does work, it was not a smooth and stable experience. We needed to hard restart the Raspberry Pi Zero W (unplugging the power cord) fairly frequently, maybe as much as twice a week. This was due to the Raspberry Pi Zero W not responding at all, and Home Assistant not being accessible. We would recommend a Raspberry Pi with at least 1 GB of RAM for a stable experience, although we are using a 2 GB version at the moment with absolutely no issues.
These observations describe our setup at the time of this walkthrough, not a current support guarantee for the Zero W. For a new installation, Home Assistant now recommends a Raspberry Pi 4 or 5 with at least 2 GB of RAM and the matching 64-bit OS image.
What You'll Need
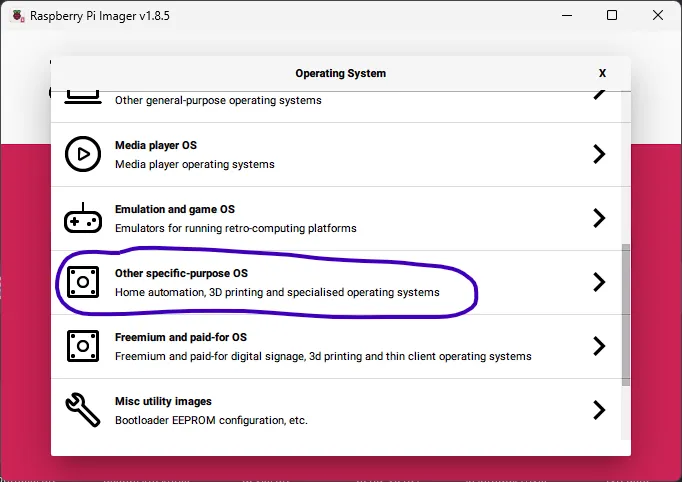
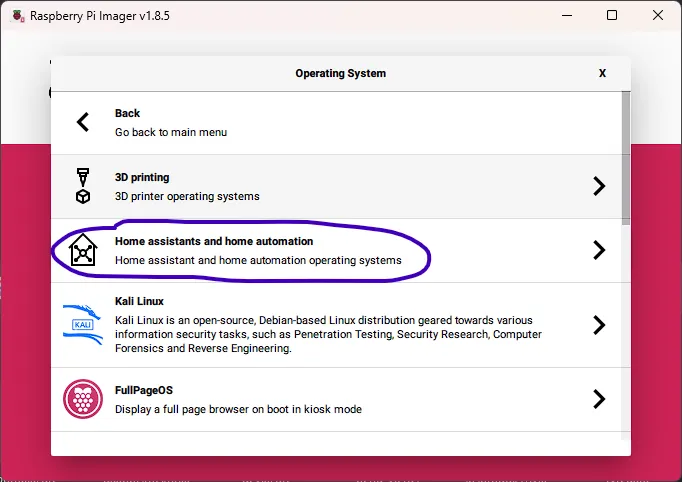
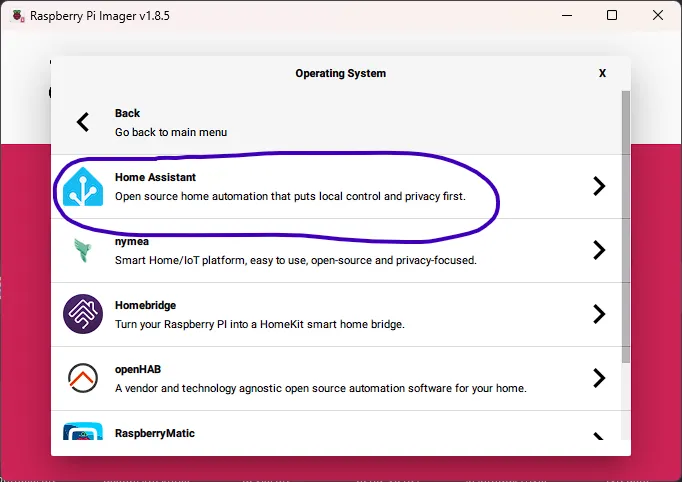
To get started, gather the following items. The screenshots below show Raspberry Pi Imager 1.8.5; they remain valid illustrations of the menu path used for this walkthrough. Newer Imager releases may use different labels and button placement.
- Raspberry Pi: For a new supported setup, use Raspberry Pi 4 or 5 with at least 2 GB RAM, following the current Home Assistant guide.
- microSD Card: At least 32 GB. Home Assistant recommends an Application Class 2 (A2) card for small read/write operations; speed-class labels alone do not guarantee reliability.
- Power Supply: Use a suitable power supply for your exact Pi model and connected peripherals. One 5 V/3 A recommendation does not cover every board, especially a Pi 5 with added storage.
- Network Access: An Ethernet connection is required for the documented first installation, with internet access. Wi-Fi can be configured afterward, although Ethernet remains the recommended reliable option.
- Computer: To flash the Home Assistant image onto the microSD card.
- Card Reader: For writing the Home Assistant image to the microSD card.
Step 1: Install Home Assistant OS on the SD Card
- Download Raspberry Pi Imager:
- Visit the Raspberry Pi Imager download page and install it on your computer.
- Insert the microSD Card:
- Connect your card reader with the microSD card to your computer.
- Launch Raspberry Pi Imager:
- Open the Raspberry Pi Imager application.
- Select the Operating System:
- Click Choose OS.
- In the pictured version, select Other specific-purpose OS > Home assistants and home automation > Home Assistant. The current Home Assistant guide calls the middle category Home automation.
- Select the Home Assistant OS image matching your actual Raspberry Pi model, not the installer for Home Assistant Yellow.
- Select the Storage:
- Click Choose Storage or the corresponding storage selector and pick the correct microSD card. Check its identity and capacity; the writing process overwrites its contents.
- Write the Image:
- In the pictured Imager workflow, click Write. In current versions, proceed through Next to Write. Review the selected OS and storage device before confirming.
- Wait for the process to complete, then safely eject the microSD card.
Imager simplifies writing the selected image, but you still need the correct hardware-specific image and a successful write/verification. The selection does not make an unsupported board compatible.
Step 2: Set Up Your Raspberry Pi
- Insert the microSD Card: Place the flashed card into the Raspberry Pi.
- Connect to Power and Network:
- Connect Ethernet to the same network as the setup computer, with internet access.
- Connect the appropriate power supply to start the Pi.
- Boot the Raspberry Pi: Wait for the first boot and preparation to finish. Time depends on the hardware, storage and network; 20 minutes is not a universal maximum. Avoid repeatedly cutting power while the system is preparing.
Step 3: Access Home Assistant
- Open a web browser on your computer or smartphone connected to the same network.
- Enter the following URL:
http://homeassistant.local:8123- If this doesn’t work, find the Raspberry Pi’s IP address from your router and replace
homeassistant.localwith it.
- If this doesn’t work, find the Raspberry Pi’s IP address from your router and replace
Step 4: Configure Home Assistant
- Create an Account: Follow the on-screen instructions to set up your Home Assistant account.
- Set Your Location: Configure your location, time zone, and unit preferences.
- Add Devices: Home Assistant will scan for compatible smart devices on your network. You can add them now or later.
Check back in on this series for the full tutorial on setting up Home Assistant
Step 5: Extend and Automate
Now that Home Assistant is running, you can:
- Add Integrations: Access the integrations menu to connect devices like Philips Hue, Google Assistant, or Zigbee hubs.
- Create Automations: Define triggers and actions (e.g., “Turn on the lights at sunset”).
- Use Apps (formerly add-ons): Enhance Home Assistant OS with supported apps such as Node-RED for advanced automations or a file editor for custom configurations.
Tips for a Better Experience
- Backup Regularly: Use the current backup controls and keep a copy away from the Pi. Retain the backup emergency kit/decryption material when applicable; a backup only on the same failed storage is insufficient.
- Expand Storage: For advanced setups, consider using an external SSD instead of a microSD card.
- Stay Updated: Regularly update Home Assistant to access new features and security patches.
- Explore the Community: Join forums and groups for tips and advice on advanced configurations.
Why Choose a Raspberry Pi for Home Assistant?
- Cost-Effective: Affordable compared to dedicated smart home hubs.
- Customizable: Tailor the setup to your exact needs.
- Expandable: Add more devices and integrations as your smart home grows.
With your Raspberry Pi-powered Home Assistant, you’re now in control of your smart home like never before. Have fun exploring automations and making your home truly smart!
Storage Choices: SD Boot and an External Data Disk
Home Assistant's recorder stores history, so write activity depends on configured devices, entities and retention. A storage device has finite endurance, but there is no universal six-to-twelve-month SD-card lifespan. A suitable card remains part of the documented installation. For a larger or write-heavy setup, assess supported external storage and adequate power rather than treating an SSD as a loss-free two-click upgrade.
Moving the data disk is different from changing the boot device. Home Assistant OS can move its data partition to a supported attached disk while the original SD card still boots the OS. Direct USB or NVMe boot is a separate hardware/bootloader/image compatibility choice. Do not assume every Pi, adapter and NVMe HAT can be flashed and booted through exactly the same path.
The current OS guide documents Settings > System > Storage > Move data disk. First create and download a full backup and retain the required recovery material. The destination disk is overwritten, and its capacity must be larger than the existing boot disk's capacity. Verify the target carefully and follow the documented reboot/process rather than interrupting it.
After a move or restore, check that integrations, history and any installed apps work, and arrange continued backups outside the device. A working dashboard is not proof that every data source or automation has recovered. Extra SSD power draw can also expose an inadequate supply or hub arrangement.
Place Radio Adapters Away from Interference
Home Assistant's ZHA guidance recommends a shielded USB extension cable, a USB 2.0 connection and positioning the Zigbee coordinator away from known interference sources such as USB 3 equipment, SSDs and Wi-Fi access points. Placement and shielding matter; a fixed 10-centimetre boundary or dramatic improvement from a particular cheap cable is not guaranteed.
Zigbee and Thread commonly use 2.4 GHz, while Z-Wave uses region-specific sub-GHz frequencies. They should not all be described as the same 2.4 GHz radio. Use the device and integration's guidance, ensure the correct radio firmware and region, and check the USB device path after changes. An extension cable can be useful without proving that every connection problem was caused by USB 3 noise.
Choose Capacity for the Actual Workload
Consider the complete system cost: board, power supply, storage, case/cooling and any radio hardware. Running basic device automations and running local speech recognition or several additional apps place different demands on the Pi. Avoid relying on an invented one-second voice-command benchmark or assuming CPU clock ratio predicts application speed.
Start by verifying one simple integration and automation, then observe memory, storage and responsiveness as you add more. Check that a critical automation still behaves as intended when a device or internet-dependent service is unavailable. Some integrations work locally, while others need cloud accounts or connectivity; self-hosting the controller does not make every connected device independent of the internet.
Check Access, Backups and a Clean Restart
If homeassistant.local:8123 is unreachable, try the assigned IP address with port 8123 on the same network and check the router's client list. Name discovery may be blocked on a guest network or by stricter network settings. Check Ethernet, the selected image and console/log output before deciding to reflash; rewriting the storage is a fresh installation, not a repair that retains its contents.
Use the system's shutdown/reboot controls when available. Our historical Zero W instability is a report of that experience, not a recommendation to unplug a functioning installation repeatedly. Before relying on the hub, test a backup restore to suitable spare hardware or an isolated instance and confirm an automation and representative history. Keep direct port forwarding separate from remote-access planning; a local setup does not require exposing the unauthenticated first-start page to the internet.