Home Assistant is useful when you are away as well as when you are at home: you can check a sensor, adjust a light or respond to an alert. Remote access adds a new network path to the same home automation system, so choose that path before changing router settings. This guide explains the choices, the role of Dynamic DNS and the checks that make a remote connection dependable.
Why Access Home Assistant Remotely?
Remote access to Home Assistant allows you to:
- Monitor your home while traveling.
- Follow up on notifications about motion or a door opening by checking the relevant dashboard or camera.
- Control devices even when you're not connected to your home Wi-Fi.
- Check your home while away when the chosen connection, home internet and Home Assistant are available.
Choose Your Remote Access Method First
Router requirements depend on the method. Home Assistant Cloud provides a managed remote connection without inbound port forwarding. A VPN lets enrolled devices reach private services, but its connectivity requirements depend on the VPN you deploy. A public HTTPS reverse proxy requires a reachable internet endpoint, a certificate and careful forwarding rules. Dynamic DNS is relevant when that public address changes; it does not itself make a service reachable.
| Approach | Who maintains the connection? | Practical consideration |
|---|---|---|
| Home Assistant Cloud | The cloud service handles the remote endpoint; you maintain Home Assistant and accounts | Check the current subscription terms and integrations you need |
| Private VPN | You maintain the VPN and enrolled devices | Your phone needs the appropriate VPN connection to reach private addresses |
| HTTPS reverse proxy | You maintain DNS, certificates, the proxy and public access | Requires a route from the internet to the proxy and ongoing updates |
For the reverse proxy route, reserve stable LAN addresses for Home Assistant and the proxy. Forward only the public service you intend to expose, normally HTTPS on port 443. Keep the Home Assistant backend private. A different port number does not replace authentication or encryption.
Setting Up DynDNS
What is DynDNS?
Dynamic DNS (DynDNS) updates a stable hostname (like myhomeassistant.dyn.net) to point to your changing public IP address. This makes it easier to access your Home Assistant without remembering or checking your IP address constantly.
Steps to Set Up DynDNS
- Choose a DynDNS Service Provider: Options include No-IP and DuckDNS. Check current hostname limits, renewal requirements and the updater supported by your exact router.
- Register an Account: Sign up and create a domain name. For instance, you might choose
myhomeassistant.duckdns.org. - Configure Your Router:
- Log into your router’s admin panel.
- Locate the Dynamic DNS section (usually under advanced settings).
- Select a provider the router actually supports, then enter the required credentials or token and chosen hostname. Do not assume every router supports DuckDNS directly.
- Keep Records Updated: If the router lacks your provider, use its documented updater on an always-on device. Protect its token and inspect the update result. DuckDNS auto-detects IPv4 when its IP parameter is omitted; IPv6 needs deliberate record handling.
Tips for Choosing DynDNS URLs
- Keep it simple and memorable, like
tech-decode-smart-home.duckdns.org. - Avoid personal information in a public hostname for privacy. A memorable or obscure name does not act as access control.
- Check that the hostname resolves to the intended public address. If both A and AAAA records exist, confirm that each reaches the intended endpoint; an outdated IPv6 record can cause intermittent failures.
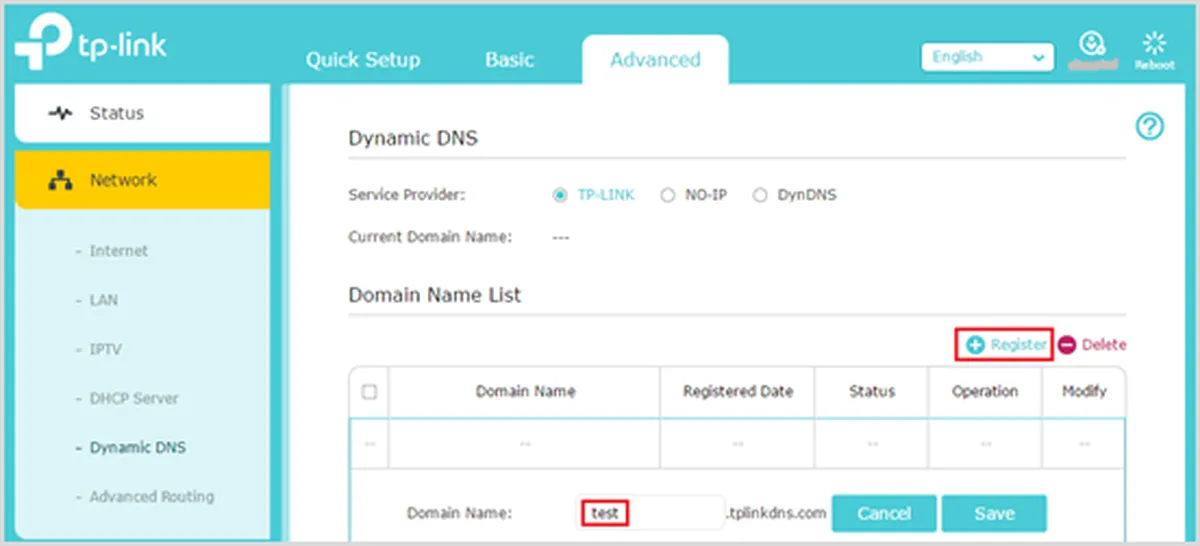
The TP-Link screenshot shows the router’s own tplinkdns.com registration flow, with TP-Link, No-IP and DynDNS choices. It is an example of provider-specific configuration, not a DuckDNS form. The TP-Link DDNS guide requires a supported router and a bound TP-Link ID. Check the exact model, hardware revision and firmware for the available choices.
Configuring Home Assistant for Remote Access
- Confirm that Home Assistant works locally and save a current backup before changing networking.
- Configure the chosen cloud, VPN or HTTPS proxy connection. Changing the HTTP listening port only changes where the server listens; it does not establish secure remote access. Check the actual port under Settings > System > Network.
- For a proxy, obtain a valid certificate for the hostname, enable WebSocket support and verify private backend reachability before opening public access. Let’s Encrypt can issue certificates through a supported ACME client. Its HTTP-01 challenge needs public port 80; DNS-01 validates a DNS record without opening that port. Choose the challenge deliberately and test automatic renewal.
- Set the Home Assistant external URL under Settings > System > Network > Home Assistant URL, then configure the companion app’s internal/external URLs or Cloud option. A public URL and a VPN-only address have different reachability requirements. For a VPN route, test that the phone reconnects to the VPN after switching networks.
- Test on mobile data with Wi-Fi disabled. Log in normally and check a harmless sensor or light rather than a lock, garage door or other sensitive control.
Security Considerations
When accessing Home Assistant remotely, security is critical:
- Use Strong Passwords: Ensure your Home Assistant account and DynDNS account use unique, strong passwords.
- Enable Two-Factor Authentication (2FA): Enable the authenticator option in each user’s User profile > Security. Protect its setup secret and check a fresh login before relying on it while away.
- Restrict Access: Limit forwarding to the required service. HTTPS normally uses port 443; security comes from correct TLS, access control and maintenance.
- Regular Updates: Keep your Home Assistant and router firmware updated to patch vulnerabilities.
- Monitor Logs: Check Home Assistant logs for any suspicious activity.
Keep the Home Assistant Backend Private
Do not expose an unencrypted Home Assistant HTTP listener directly to the internet. HTTPS protects credentials and traffic in transit; Home Assistant authentication still decides who can control your home. Treat long-lived access tokens as passwords, and revoke unused tokens or lost-device sessions.
Configure Proxy Trust Precisely
For a traditional reverse proxy, enable Trust X-Forwarded-For and add its actual immediate source address to Trusted proxies. For example, a separate proxy at 192.168.1.31 should be trusted only if that is the address Home Assistant actually sees. Container networking can change it. Check the rejected-request log rather than trusting a whole LAN. Home Assistant Cloud uses a secure tunnel and does not need these proxy settings.
On Home Assistant 2026.8 and later, manage HTTP settings in Settings > System > Network > HTTP server. Existing installations keep their port; new Home Assistant OS installations default to 80, while Container defaults to 8123. Update proxy targets and app URLs if you deliberately change it. Saving restarts Home Assistant; confirm working settings within five minutes or they revert. Keep local access available during this check.
For a release before 2026.8, the following is a legacy YAML example, with an example proxy address and a chosen five-failure ban threshold:
http:
  use_x_forwarded_for: true
  trusted_proxies:
    - 192.168.1.31
  ip_ban_enabled: true
  login_attempts_threshold: 5
On that older release, merge the example into one existing http: section and validate before restarting. After upgrading to the UI-based configuration, verify the imported settings and follow the repair instructions to remove the old block. IP bans do not expire automatically; use the documented ip_bans.yaml recovery procedure for an accidental ban. Avoid caching /api/, /auth/ or frontend HTML through the proxy.
Diagnose Remote Access in Layers
Start with local access. If the dashboard fails on the LAN too, investigate Home Assistant before the router. If local access works, try the remote hostname from cellular data. A failed DNS lookup points to the hostname or updater; a connection timeout points to reachability; a certificate warning points to hostname, certificate or proxy configuration. A login rejection is a different problem again. Record the exact error and time rather than changing several settings together.
Compare your router's WAN address with your internet-facing address when considering inbound forwarding. Carrier-grade NAT or an upstream router can prevent a forwarding rule on your own router from reaching the internet. Dynamic DNS cannot remove that obstacle. Ask your ISP about public addressing or choose a connection architecture that does not require inbound forwarding. IPv6 needs its own routing and firewall review rather than an assumption that IPv4 NAT rules cover it.
A hostname working on mobile data but failing on home Wi-Fi can indicate local DNS or NAT loopback behavior. Use the internal app URL or deliberately configured local DNS for that case. Also check for an old external URL saved in the app after a hostname change. Avoid weakening TLS checks to make an outdated address work.
Test Day-to-Day Use and Recovery
Build a small acceptance checklist: load the dashboard, open the history of a known sensor, send a test notification and reconnect after switching between Wi-Fi and mobile data. Test after a planned router or Home Assistant restart too. A notification arriving does not prove that the app can fetch the dashboard or a camera image through the same route.
Keep a note of the selected method, hostname, proxy address and certificate renewal arrangement. Keep the authenticator’s recovery material or securely stored setup secret separate from that networking note. Before travel, confirm a recent backup exists and that a second trusted administrator can still access the system. Remote access is most useful when it remains understandable enough to repair without exposing extra services during an outage.
Summary
Choose the remote access architecture that matches your needs and maintenance time. Use Dynamic DNS only where a changing public address calls for it, keep private backend ports private and verify access from a genuinely external network. Reliable DNS, correct proxy trust, MFA and tested recovery are more useful than opening extra router ports.
Sources and Further Reading
- Home Assistant remote access
- HTTP integration and trusted proxies
- Companion app networking troubleshooting
Further detail: Home Assistant 2026.8 networking changes, MFA setup, certificate challenge requirements and DuckDNS update specification.