Tired of dead zones and buffering? A mesh system can be a useful way to extend coverage, but choosing the right kit and placing it well matter as much as the brand on the box. This guide explains how to plan a home mesh network, connect it to your existing internet equipment and check that it solves the problem you bought it for.
Picking Your Mesh System
Start with the problem: poor coverage in one room, slow local transfers, busy evening traffic or unreliable calls. A small home may work well with one suitably placed access point; a larger or awkwardly shaped property may need several. Mesh is an option, rather than an automatic requirement whenever Wi-Fi feels slow.
Know Your Needs
- Layout: Note the internet entry point, floors, thick walls and the rooms where a dependable connection matters.
- Workload: Consider active streaming, calls and local file transfers, rather than counting every idle smart device as equivalent traffic.
- Budget: Include the kit, any switch or cabling and subscriptions for features you actually want.
- Management: Check account and app requirements, supported phones and whether the controls suit the person maintaining the network.
- Compatibility: Confirm expansion support for the exact product family, hardware version and region. Sharing a manufacturer's name does not guarantee two systems can form one mesh.
Wi-Fi Standards and Bands
Wi-Fi 5 can still serve basic needs; Wi-Fi 6 adds efficiency features for compatible clients; Wi-Fi 6E adds access to 6GHz; and Wi-Fi 7 adds capabilities such as multi-link operation. Choose according to your devices and workload. Older clients do not acquire newer radio features merely by connecting to a new router.
Dual-band kits commonly use 2.4GHz and 5GHz. A third radio can provide another 5GHz band or a 6GHz band, depending on the design. Some systems reserve a radio for backhaul, while others share or dynamically allocate it. Read the model's actual arrangement instead of treating “tri-band” as a guarantee of dedicated backhaul.
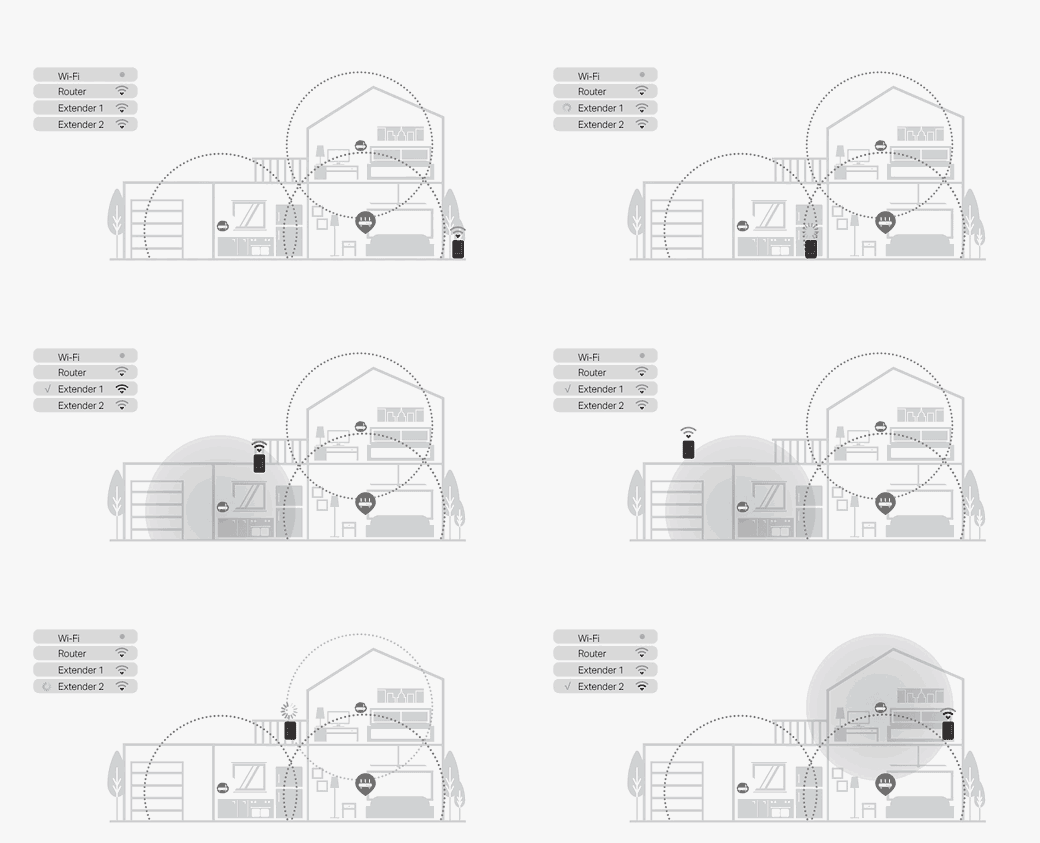
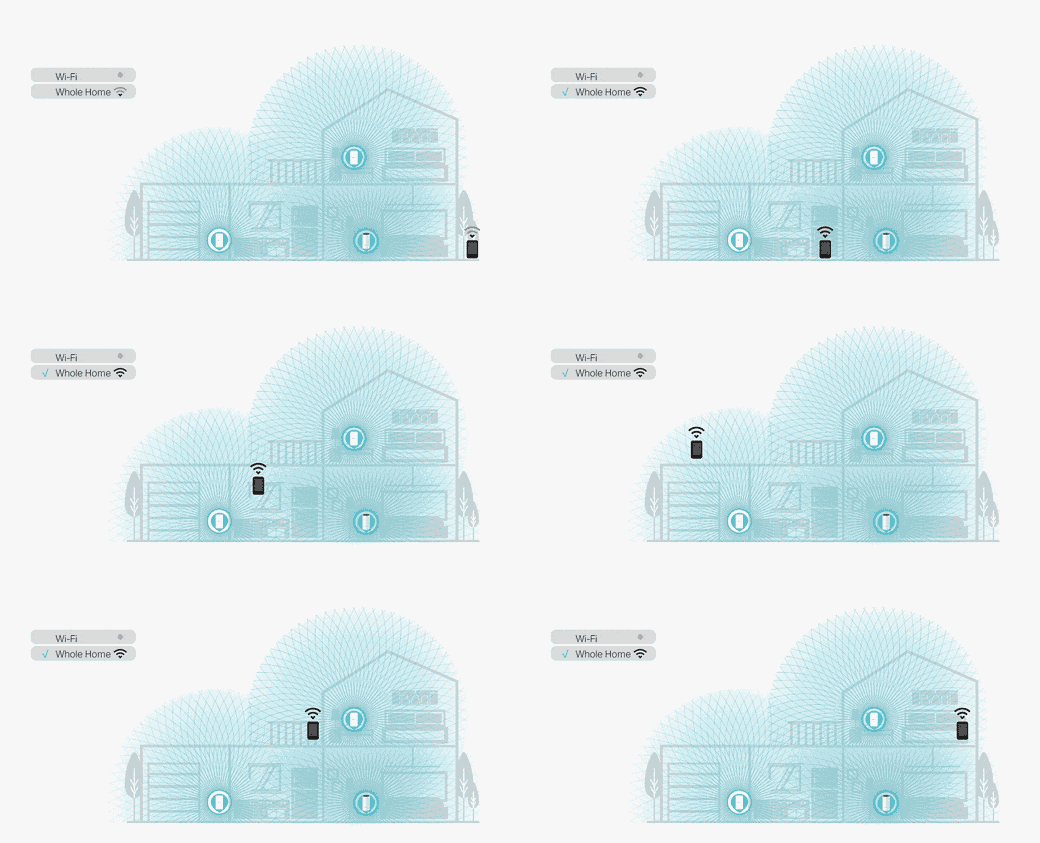
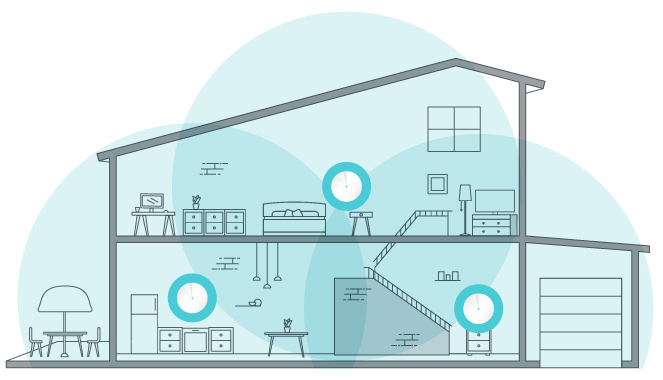
These illustrations explain the intended coverage pattern. Your home's walls and client devices determine the real result; the diagrams are not measured coverage maps for your property.
Placement, Backhaul and Features
TechDecode recommends investing in a system that supports Ethernet backhaul and using cables where practical. Wiring the nodes removes the need for that wireless hop and can help with thick walls or busy rooms. It does not guarantee full speed at every distance: port speeds, cabling, upstream links and the final Wi-Fi connection still matter.
For wireless satellites, start in open locations between a strong upstream connection and the room needing coverage. Avoid hiding nodes behind metal furniture or immediately beside sources of interference. Use the kit's connection-quality view to refine placement; a satellite in a dead zone may have a weak connection of its own.
Add nodes only where they help. Too many closely placed units can create unnecessary overlap and competition. Before expanding, move a node and test again. Check guest networking, parental controls, security tools and MU-MIMO on the actual model: useful features are not exclusive to expensive kits, and advanced services may carry a subscription.
Understanding the Speed Figures
AC, AX and BE class numbers usually combine theoretical radio rates across bands. A kit labelled 3000Mbps does not give one phone a 3000Mbps application connection. The client adapter, selected band, signal, radio sharing and backhaul all affect usable throughput.
Your internet service is a separate limit. A faster local wireless link cannot increase the speed your ISP supplies, but it may help compatible devices approach that service rate or transfer files to a local server. Compare the complete path, including any slower Ethernet port, rather than assuming a high class number is either essential or useless.
Choose the Routing Arrangement Before Setup
Identify whether the existing ISP box is a modem/ONT, a router or a combined gateway. Record the current connection settings and check whether the service needs PPPoE credentials, VLAN tagging, telephone or IPTV support. Keep the working setup available while you plan the change.
| Arrangement | Who routes? | What to confirm |
|---|---|---|
| Mesh in Router mode with a supported bridged upstream gateway | Main mesh router | ISP instructions, authentication and required gateway services |
| Mesh in supported Access Point mode behind the existing router | Existing router | Mesh support in AP mode and which gateway features disappear |
| Mesh router behind an upstream router | Both routers may perform NAT | Whether double NAT affects your particular games, inbound connections or discovery needs |
Double NAT does not automatically cause noticeable browsing or streaming problems. It can complicate port forwarding, some games and communication between devices on different private networks. Two Wi-Fi networks can also compete for radio airtime, but that interference is a different issue from address translation.
Bridge mode, IP passthrough and a general DMZ/default-host setting are not interchangeable names for one procedure. Follow the exact gateway's documentation. AT&T, for example, describes passthrough as a gateway-specific alternative to bridging, while its default-server mode still assigns the downstream device a private LAN address.
AP mode is also product-specific. Deco supports it but loses gateway features such as its parental controls and QoS in that mode. Google documents bridge mode only for a single Wifi device, not a multi-unit Google mesh. Do not switch a kit to AP/bridge mode on the assumption that every brand retains the same functions.
Installation: Follow the Kit's Supported Procedure
- Prepare: Install the official management app if required, confirm account access and keep ISP settings available.
- Connect the main unit: Use the documented internet/WAN connection to your modem, gateway or Ethernet service outlet.
- Complete initial setup: Select the connection type, create the Wi-Fi name and password, and verify internet access from the main unit.
- Add satellites: Use the manufacturer's pairing procedure. For Deco Ethernet backhaul, add the units to the same network before cabling them.
- Check firmware: Review and apply the supported update procedure for the correct hardware version.
- Move and test: Place satellites in the planned locations, check their upstream links and connect your everyday devices.
In Deco Router mode, wired satellites belong on the main Deco's LAN side, directly or through a downstream switch. Its AP-mode topology permits a different arrangement behind the existing router. Use the model's wiring guide and avoid adding duplicate paths that create loops.
The original examples still illustrate different choices: Deco M5 as a straightforward budget-oriented Wi-Fi 5 kit, Nest Wifi as an app-managed home option, and Orbi RBK753 as a more capable tri-band Wi-Fi 6 system. These are established models, not a current price ranking.
M5 supports Ethernet backhaul and includes guest and parental features, showing why budget should not be equated with “no controls”. Nest Wifi points include a speaker/voice assistant but no Ethernet port; its routers have different roles, and Nest Wifi Pro does not mix into that older mesh. NETGEAR does not support splitting the RBK753's main 2.4GHz and 5GHz network into separate SSIDs, so do not buy it expecting that control.
Check Placement Without Guessing From Signal Bars
If your equipment reports RSSI in dBm, a less negative value indicates a stronger received signal: for example, -55dBm is stronger than -75dBm. There is no single universal “too close”, “perfect” or “too far” range for all mesh kits, bands and layouts. Signal quality, noise and the required data rate also matter.
A phone's Wi-Fi reading describes the phone's link to an access point. It does not directly measure the satellite's backhaul. Use the mesh app's node connection details for that link, then test your phone or laptop from the room where it will be used. Ethernet-backed nodes need a checked wired uplink as well as good client coverage.
Verify the Finished Network
Walk through the important rooms with the actual devices you use. Test a call, stream or local transfer, then repeat while other household traffic is active. Check which node each device uses and whether an unwired satellite still has a useful upstream connection. Roaming depends partly on the client, so a common Wi-Fi name alone is not proof of uninterrupted handovers.
Save the final layout, node names and routing mode. If something fails, test the main unit first, then one satellite at a time. A well-chosen system with a verified layout can make home Wi-Fi far more pleasant, and the wired-backhaul option remains a worthwhile investment where you can use it.
Use the Deco setup guide, Nest setup guide and Orbi band-SSID guidance for product-specific details.