Ever wished you could make your different apps and gadgets talk to each other without needing a computer science degree? Maybe you want to automatically turn on a light when you arrive home, get a notification when your favorite website updates, or create a simple dashboard to track your home's temperature. We have a few of these steps already covered in our Build your own homelab series, but we don't have any automation integration yet. Let's dive into the world of Node-RED, a powerful yet surprisingly accessible tool that can make these kinds of automations a reality.
What Exactly is Node-RED?
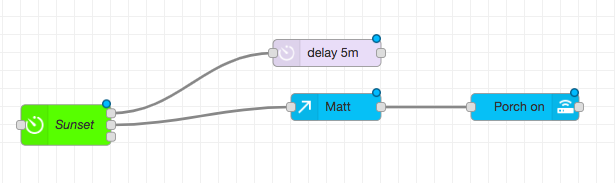
At its heart, Node-RED is a visual programming tool. Think of it like a digital Lego set for connecting different hardware devices, online services (APIs), and even your own custom code. Instead of writing lines and lines of complex code, you drag and drop "nodes" onto a canvas and connect them with "wires" to create "flows" (just like a business flow chart). For example, a supported sunset trigger can pass a message to a configured light-control action. The location, schedule, credentials and device integration still need to be set correctly.
Each node represents a specific function. It could be:
- An input: Something that triggers your flow, like a sensor detecting motion, an event from a supported online service, or a button press on a Raspberry Pi.
- A process: An action performed on the data, like formatting a message, checking a condition (e.g., is it daytime?), or converting temperature from Celsius to Fahrenheit.
- An output: The result of your flow, such as sending an email, turning on a smart light, posting a message to a chat app, or storing data in a database.
These interconnected nodes form a flow, which is essentially an automated task or a series of actions. Node-RED runs these flows, tirelessly working in the background to execute your digital instructions.
How Does Node-RED Work Its Magic?
For a sunset lighting automation, the general pattern is:
- A "sun position" node (input) that knows when sunset occurs in your location.
- An optional condition that checks relevant state, such as whether someone is home. A Switch node tests a configured message or context value; it does not inherently know the time of sunset.
- A "smart light/bulb" node (output), which receives the "on" command.
You configure the nodes, connect the relevant outputs and deploy the flow. The image below is an illustrative lighting flow: Sunset branches toward delay 5m and a node labeled Matt, with the visible Matt branch leading to Porch on. It does not show the optional Switch node described above or each node’s settings, so it is not a complete importable recipe. Keep the trigger, conditions and action configuration aligned with your own devices.
Comparing Node-RED vs. The Others
It's easy to get Node-RED confused with other automation tools. Let's clarify some common comparisons:
Node-RED vs. n8n:
- n8n is also a workflow automation tool that uses a visual, node-based interface. However, n8n is often more focused on connecting web services and automating business processes. It excels at tasks like syncing data between different cloud applications (like Google Sheets, Slack, and Trello), managing customer relationship management (CRM) workflows, and handling data transformations between various online platforms. While it can interact with some devices, its core strength lies in the digital and cloud realm.
- Node-RED, while also capable of connecting to web services, has stronger roots in the Internet of Things (IoT) and interacting with physical hardware. It's commonly run on devices like Raspberry Pis and is excellent for home automation, controlling sensors, managing industrial equipment, and creating custom dashboards to visualize data from connected devices. The right choice depends on the supported integrations and the logic you need, rather than a universal ranking of hardware control.
Think of it this way: If your primary goal is to automate online tasks and business workflows, n8n might be a more direct fit. If you're looking to control physical devices, build custom smart home logic, or tinker with IoT projects, Node-RED is likely your champion.
Node-RED vs. Home Assistant:
- Home Assistant is a comprehensive open-source home automation platform. Its primary goal is to be the central hub for all your smart home devices, providing a user-friendly interface to control them, create automations, and manage your entire smart home ecosystem. It comes with many pre-built integrations for popular smart devices and focuses heavily on the end-user experience for home automation.
- Node-RED is a more general-purpose visual programming tool. While it's incredibly popular for home automation (and often used alongside Home Assistant to create more complex or custom automations), its capabilities extend far beyond just smart homes. You can use Node-RED for data visualization, prototyping IoT devices, interacting with databases, building custom APIs, and much more. Home Assistant provides a ready-to-go smart home solution; Node-RED provides the building blocks for countless types of event-driven applications.
In essence: Home Assistant is a home automation platform; Home Assistant OS is one deployment option. Node-RED is a flexible workshop for building all sorts of automated processes, including (but not limited to) highly customized smart home routines. Some users prefer Node-RED’s visual flows for their automation logic, while Home Assistant also has capable built-in automations. The tools can complement each other; Node-RED is not required for every complex routine.
Pros and Cons of Node-RED
Like any tool, Node-RED has its advantages and disadvantages:
Pros:
- Visual and Intuitive: The drag-and-drop interface makes it relatively easy for non-programmers to grasp the basics and build simple flows.
- Highly Flexible and Extensible: A vast library of community-contributed nodes means you can connect to an incredible array of devices, services, and APIs. If a node doesn't exist, you (or someone with coding skills) can create one.
- Excellent for IoT and Hardware Interaction: Node-RED shines when it comes to controlling and reading data from physical devices like Raspberry Pis, Arduinos, sensors, and actuators.
- Lightweight and Efficient: It can run on low-power devices like a Raspberry Pi, making it ideal for always-on applications.
- Active Community: A large and supportive community means plenty of tutorials, examples, and help are available online.
- Browser-Based Editor: You can access and manage your Node-RED flows from any device with a web browser on your local network.
- Great for Prototyping: Quickly test ideas and build working prototypes without getting bogged down in traditional coding.
Cons:
- Learning Curve for Complex Logic: While simple flows are easy, creating very complex or highly customized logic can still require a deeper understanding and may involve some JavaScript coding within "function" nodes.
- Debugging Can Be Tricky: For non-technical users, figuring out why a complex flow isn't working as expected can sometimes be challenging, though the visual nature helps.
- Not a Full-Fledged Programming Environment: For extremely performance-intensive tasks or highly specialized software development, traditional coding languages might be more suitable.
- User Interface (UI) for End-Users: While the Node-RED editor is for building flows, creating polished user interfaces for others to interact with your automations (like a custom smart home control panel) often requires additional tools or nodes. The legacy
node-red-dashboardpackage was deprecated in June 2024; consider maintained alternatives such as FlowFuse Dashboard for a new project. Existing dashboards need a planned migration rather than an assumed drop-in replacement.
Where Node-RED Truly Shines: Inspiring Use Cases
Node-RED's versatility makes it suitable for a wide range of applications. Here are some scenarios where it excels:
- Custom Home Automation:
- Create complex lighting scenes based on time of day, occupancy, and even the movie playing on your media center.
- Build a custom security system that sends you a photo via Telegram if motion is detected while you're away.
- Manage your heating and cooling based on weather forecasts and your personal schedule.
- Create voice-controlled automations using smart speakers.
- IoT Prototyping and Projects:
- Read data from environmental sensors (temperature, humidity, air quality) and display it on a dashboard or log it to a database.
- Control motors, LEDs, and other actuators based on inputs or programmed sequences.
- Build a smart garden that automates watering based on soil moisture levels.
- Data Collection and Visualization:
- Scrape data from websites and APIs, process it, and display it in charts or graphs.
- Monitor the status of your online services or servers.
- Track personal metrics and display them on a custom dashboard.
- Notifications and Alerts:
- Get notified via email, SMS, or push notification when specific events occur (e.g., a door opens, a server goes down, a particular stock price changes).
- Filter and forward important emails to different platforms.
- Bridging Different Systems:
- Connect services that don't natively talk to each other (e.g., make your Fitbit data trigger an action on your Philips Hue lights).
- Translate data between different protocols or formats.
Node-RED Community and Resources
One of Node-RED's greatest assets is its vibrant and helpful community. If you get stuck or need inspiration, you're not alone:
- Official Node-RED Website (nodered.org): The go-to place for documentation, installation guides, and the official forum.
- Node-RED Flow Library: Discover and share pre-built flows and nodes created by the community. This is a fantastic resource for finding solutions or examples related to what you want to achieve.
- Online Forums and Communities: Websites like Reddit (r/nodered) and various smart home forums have active Node-RED discussions where you can ask questions and learn from others.
- YouTube Tutorials: Many creators offer video tutorials ranging from beginner introductions to advanced project builds.
Conclusion: Your World, Automated Your Way
Node-RED empowers you to become a creator of custom automations and a conductor of your digital and physical devices. Its visual, flow-based approach lowers the barrier to entry, allowing even non-technical users to build powerful and practical applications.
While it differs from more specialized platforms like n8n (focused on web service automation) and Home Assistant (a dedicated smart home hub), Node-RED offers considerable flexibility for those who want to tinker, customize, and connect a diverse array of technologies. Its strengths in IoT, hardware interaction, and rapid prototyping, combined with a supportive community, make it an invaluable tool for anyone looking to bring their unique automation ideas to life.
So, are you ready to start connecting the dots and building your own automated world? Give Node-RED a try – you might just surprise yourself with what you can create!
Deploying Node-RED in Docker Compose
Node-RED can run independently or alongside Home Assistant through an appropriate community app, historically called an add-on. A container is a useful option, but memory use and platform support depend on the version and installed nodes; there is no universal 60 MB footprint or guarantee for every Raspberry Pi.
For a new Linux deployment, create a dedicated data directory. These commands are for a new empty directory, not recursively changing ownership of an existing service’s files:
mkdir ./node-red-data
sudo chown 1000:1000 ./node-red-data
Save the following as compose.yaml beside that directory. The official image uses UID 1000 and stores user data under /data. This initial example binds the editor to the host’s loopback interface so you can configure access before making it reachable more widely.
services:
  node-red:
    image: nodered/node-red:latest
    container_name: node-red
    restart: unless-stopped
    user: "1000:1000"
    environment:
      - TZ=Etc/UTC
    volumes:
      - ./node-red-data:/data
    ports:
      - "127.0.0.1:1880:1880"
docker compose up -dOpen http://127.0.0.1:1880 in a browser on the host, or use an SSH tunnel from your computer to the host’s loopback port. A remote computer cannot reach this binding by browsing to the server’s LAN IP. Set the timezone for your location and confirm the timezone used by any scheduling node as well.
Check the chosen image’s supported architecture and release notes before pulling it. For example, the June 2026 Node-RED 5 release requires Node.js 22.9.0 or later for a direct installation and changed the official Docker image platform support. For an ongoing deployment, select and record a tested version tag rather than assuming latest will keep the same runtime and community-node compatibility.
Understanding Messages and Context
Nodes pass messages that are JavaScript objects. Properties can hold strings, numbers, booleans, arrays or objects; each node’s help explains what it expects. A node may modify or forward a message, create another message, or consume it without sending anything onward.
msg.payload: The main data property many nodes use. A sensor’s data might be an object containing a temperature, or a string containing JSON. Those are different types: use a Debug node to inspect the value, then a JSON node when conversion is required.msg.topic: Often identifies a source or routing topic, such as an MQTT topic. It is meaningful according to the nodes in your flow, not a required identifier with one universal interpretation.- Context: Node context belongs to a node, flow context shares values within a flow, and global context is available more broadly. Context is separate from the message and is stored in memory by default; it does not automatically survive a restart.
If you need file-backed context, merge a contextStorage setting using the localfilesystem store into the existing /data/settings.js configuration. Preserve the surrounding JavaScript object and commas. The default store buffers writes with a 30-second flush interval; values not yet flushed can be lost if the process is killed unexpectedly. File-backed context is therefore not a substitute for durable application storage when losing an event would matter.
Palette Packages and Editor Security
Manage Palette can install community packages, but check their maintenance, runtime requirements and documentation before adding them. An installed node runs code with the runtime’s access, so a convenient connector should still be treated as software you trust.
node-red-contrib-home-assistant-websocket: Connects to Home Assistant using its server configuration and access token. Standalone and Home Assistant app setups can differ. Follow the package’s current requirements, protect the token, and verify the node’s connection status before wiring an action.@flowfuse/node-red-dashboard: The maintained Dashboard 2.0 package. Its publisher documents staged migration from the legacy dashboard, with some widgets and templates requiring manual changes. Installing it does not automatically convert every existing dashboard.
The editor and admin API have no authentication by default. Before enabling broader access, create your own bcrypt hash:
docker exec -it node-red node-red admin hash-pwIn the mounted node-red-data/settings.js, configure the existing adminAuth section with credential authentication, your chosen username, the generated hash and appropriate permissions. Do not use the documentation’s demonstration password or replace the entire settings file with a fragment. Restart the container and verify that a fresh browser session requires login and that your account can perform only the intended actions.
adminAuth protects the editor and admin API; HTTP In routes and dashboards require their own applicable access controls. The official security guide describes httpNodeAuth, HTTPS and middleware options. If using a reverse proxy, ensure users cannot bypass it through an exposed container port, and use protected access for sensitive credentials and control actions.
Test and Recover an Automation
Start with an Inject node and a Debug node before connecting a real action. Inspect the complete message, confirm types and units, and test both expected and missing input. For a temperature condition, for example, decide what an absent reading means rather than letting it accidentally trigger a command.
Next replace the Debug endpoint with a harmless test action. Check duplicate events, unavailable devices, timezones and reconnection after a restart. A message successfully leaving a node does not prove the physical light changed; use a relevant state check where available. Add an appropriate Catch or Status path and review node help because errors are not all reported the same way.
A delay or connection loss can leave an automation acting on stale information. Make repeated actions safe where possible, avoid unbounded retry loops and define a fallback if an external API is unavailable. For physical controls, retain an ordinary manual way to operate the device.
Back up the persistent data directory, including flows, encrypted credentials, settings and package information, and retain the credential secret needed to decrypt credentials. Keep secrets out of shared flow exports. Test restoration separately before an upgrade, then confirm integrations and schedules after deploying the restored flow. This turns an attractive diagram into an automation you can maintain and recover.